

Note: This tutorial can also be found in my GitHub repository
What is automatic speech recognition (ASR)?
Automatic speech recognition is a technology that allows computers to convert human speech into text. It is also known as computer speech recognition or speech-to-text. Some examples of ASR in our daily life include automatic captions on YouTube, voice input on our phone, etc.
Why do we need ASR in sociolinguistic research?
Research in variationist sociolinguistics often involves analyzing large amount of naturalistic speech, e.g. sociolinguistic interviews. Audio recordings must be transcribed before any analysis can take place. Conventionally, data transcription is done manually which is super time-consuming and labor-intensive! In fact, transcribing an interview takes about ten hours for every hour of recorded speech (Schilling, 2013). If you’re a busy grad student like me, you’d want to use ASR tools like whisperX to help you with data transcription. It will save you a LOT of time.
Let’s get started!
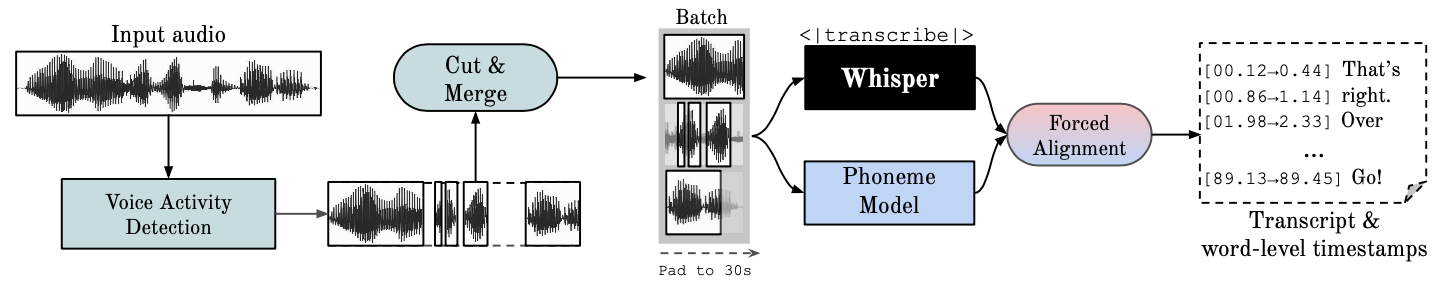
- WhisperX is a multilingual ASR model based on Whisper
- It is open-source, which means that it is freely available to the public
- It supports 28 different languages
- Key features:
- Automatically detects the languages being spoken and handles code-switching
- Separates the voices of different speakers (speaker diarization)
- Provides accurate timestamps for the transcription
- If you are analyzing a language not supported by whisperX, you may consider using whisper.cpp instead.
How to install whisperX:
1. Before installing whisperX, make sure that you have miniconda and ffmpeg installed. ✅✅
You may enter the following commands in your Terminal/Command Prompt to check whether you have miniconda and ffmpeg installed.
conda --version
ffmpeg -version
If they are properly installed, it should return the version numbers. If not, it should return an error message.
2. Go to Terminal/Command Prompt and enter the following commands
conda create --name whisperx python=3.10
conda activate whisperx
3. Install WhisperX
pip install whisperx
4. Sign up for Hugging Face

5. Accept user agreement for Segmentation and Speaker-Diarization-3.1
6. Click on your profile at the at the top-right corner and choose Access Tokens
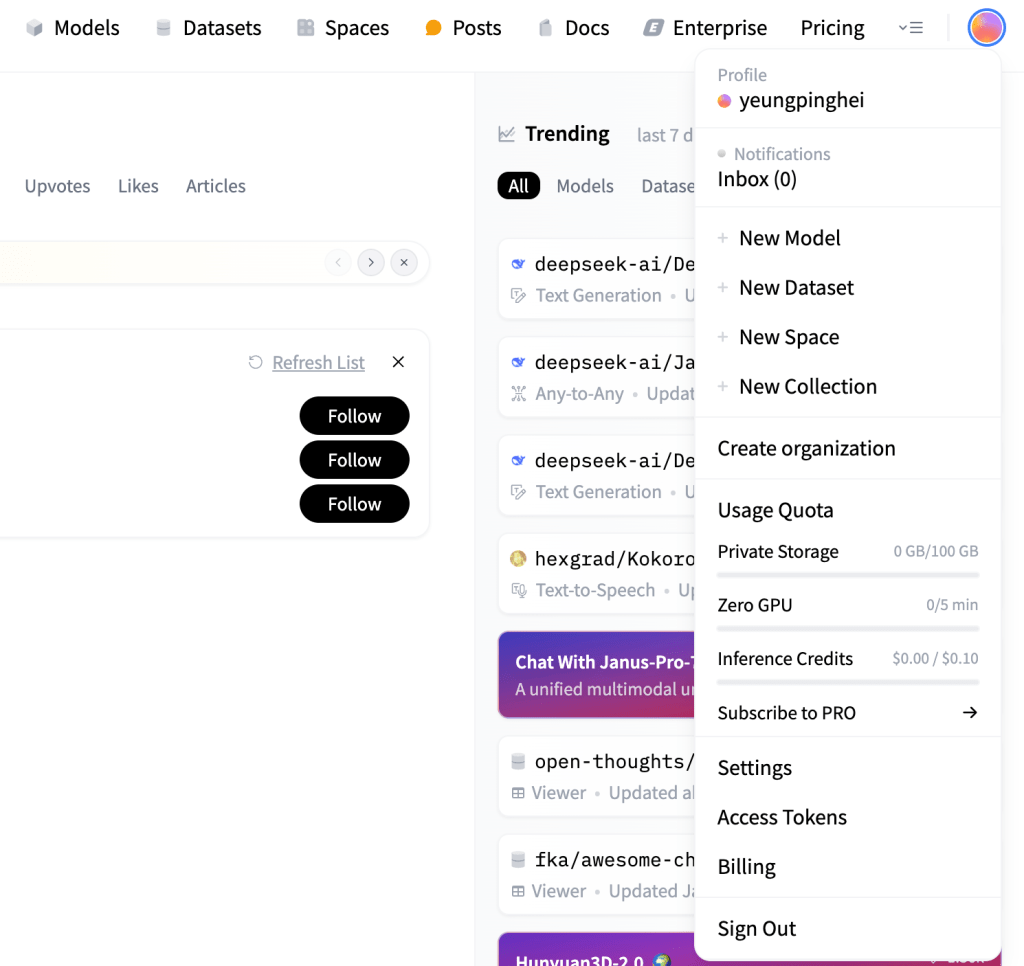
7. Create a Hugging Face access token (read). Choose Read for token type.

8. Save the access token. We will need this later.

How to use whisperX:
1. Download the example audio file example.wav from the GitHub repository. It is an excerpt from my Malaysian English interview data.
2. Go to Terminal/Command Prompt and run the following command
whisperx /your_directory/example.wav --model small --compute_type int8 --output_format srt --output_dir /your_directory/ --diarize --hf_token [your access token]
- Change
your_directoryto the directory where you saved the audio file - The option
--modeldetermines the language model being used. There are many different models available. The smaller ones are faster but less accurate, while the bigger ones are slower but more accurate. Here I am using thesmallmodel since it is a good compromise between speed and accuracy. —compute_typeshould be set toint8if you are using a Mac. Otherwise, you may skip this option.--output_formatdetermines the format of the output transcript. You may choose betweensrt,vtt,txt,tsv,json, orallfor all formats--output_dirdetermines where the output file is saved--diarizeactivates speaker diarization (separating the speech of different speakers). You can use the options--min_speakers—max_speakersto specify the number of speakers.- If you want to perform speaker diarization, you must provide your Hugging Face access token using the option
--hf_token. Replace[your access token]with your access token. - WhisperX automatically detects the language in the recordings, but you may also specify it using the option
--language. The list of all supported languages can be found here.
3. If the program runs successfully, it should generate an .srt file that looks like this:
1
00:00:00,831 --> 00:00:02,032
[SPEAKER_01]: Nope, I wouldn't say so.

2
00:00:02,132 --> 00:00:08,635
[SPEAKER_01]: Like, I mean, close in the sense that it's still within the vicinity of the greater Kuala Lumpur area, right?

3
00:00:08,715 --> 00:00:11,037
[SPEAKER_01]: Or what we would call the Kuala Lumpur Valley.

4
00:00:11,237 --> 00:00:16,579
[SPEAKER_01]: But I think it would take at least like 30 to 40 minutes drive by car to get there.

5
00:00:17,420 --> 00:00:17,760
[SPEAKER_00]: Okay.
